Illuminate Your Shots: Discover Budget-Friendly Lighting Secrets for Stunning Videos!
In the world of video production, lighting can make or break the final product. It sets the mood, enhances the subject, and can even convey emotions to your audience. A well-lit scene can elevate a video from amateur to professional, and fortunately, you don’t have to spend a fortune to achieve stunning results. This article will guide you through the realm of affordable video lighting options that can significantly improve your camera setup. Whether you're a budding YouTuber, a passionate vlogger, or a creative filmmaker, understanding how to utilize budget-friendly lighting solutions will unlock the potential of your videos and help you shine in a competitive digital landscape.
Understanding the Basics of Video Lighting
Before diving into specific lighting tools, it’s crucial to grasp the fundamental concepts of video lighting. One of the most recognized methods is the three-point lighting setup, which consists of key light, fill light, and back light. The key light is your primary light source, illuminating the subject and creating depth. The fill light softens the shadows created by the key light, while the back light adds dimension by separating the subject from the background. Additionally, understanding color temperature is essential; it refers to the warmth or coolness of the light. For instance, daylight has a color temperature of around 5600K, while tungsten light sits closer to 3200K. Lastly, the direction of light plays a significant role in shaping the look and feel of your video. Experimenting with different angles can drastically change how your subject is perceived on camera, making it vital to explore these lighting principles thoroughly.
Types of Affordable Video Lighting Options
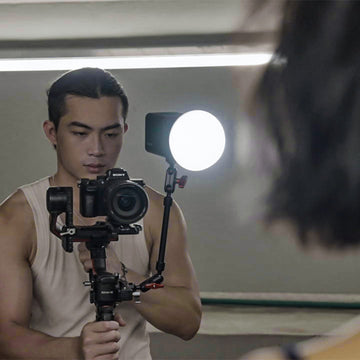
When it comes to affordable video lighting options, several types can enhance your setup without straining your wallet. LED panels are a popular choice due to their versatility and energy efficiency. They provide consistent lighting and are often adjustable in brightness and color temperature, making them suitable for various shooting scenarios—from interviews to product reviews. Softboxes are another excellent option; they diffuse light to create a soft, even glow, reducing harsh shadows and flattering your subjects. They are perfect for capturing beauty shots or any scene where you want the lighting to be gentle. Ring lights, often favored by beauty and lifestyle content creators, offer a unique circular light that evenly illuminates your face and minimizes shadows. This type of lighting is not only affordable but also highly effective for close-up shots. Each of these options presents unique benefits and can be tailored to fit different creative needs, allowing you to elevate your video quality on a budget.
DIY Lighting Solutions for Budget-Conscious Creators
If you're looking to save even more, consider exploring DIY lighting solutions using everyday household items. One of the simplest yet effective methods is to harness natural light. Position your shooting setup near a window during the day to take advantage of the soft, diffused sunlight. If you find that the light is too harsh, you can use sheer curtains or a white bedsheet to diffuse it further. Additionally, reflectors—often made from materials like aluminum foil or white cardboard—can redirect light to fill in shadows and brighten up your subject. Homemade diffusers, crafted from shower curtains or white plastic sheets, can also soften direct light sources, allowing you to achieve a more professional look. These DIY methods not only cut costs but also encourage creativity, making video production accessible to everyone, regardless of budget.
Tips for Setting Up Your Lighting
Once you have your lighting equipment or DIY solutions ready, setting them up correctly is key to achieving great results. Start by experimenting with the three-point lighting setup, ensuring that your key light is positioned at a 45-degree angle to your subject for the best effect. Avoid placing lights directly in front of the subject, as this can create flat, uninteresting images. Be mindful of shadows—using fill lights or reflectors can help soften them and add depth. Additionally, consider the mood you want to convey; warmer lights can create a cozy atmosphere, while cooler ones are more suited for professional or dramatic scenes. Don’t hesitate to adjust the distance of your lights to see how it influences the overall look. With a bit of practice and experimentation, you’ll discover how to overcome common lighting challenges and create visually stunning videos.
Mastering Affordable Video Lighting Solutions
In conclusion, mastering affordable video lighting solutions is essential for anyone looking to enhance their video quality without overspending. From understanding basic lighting principles to exploring various lighting options and DIY solutions, the possibilities are endless. Remember that great lighting is not just about the equipment; it’s about creativity and experimentation. So, don’t be afraid to try new techniques and find what works best for your unique style. With the right approach, you can illuminate your shots and captivate your audience, all while staying within your budget!